7 minutes
Jitsi on AWS (with Terraform)

Even before COVID-19, most of us were in need for some kind of conference solution. Some use proprietary ones like Google Hangouts, Zoom or one of the other popular ones out there.
But if you are in tightly-regulated industry or just want to have full control over your data and like to use open-source, then chances are high you already stumbled upon Jitsi Meet.
In this post I describe the process to setup a fully-functional Jitsi-Meet instance on AWS (+ Terraform code!)
Features
- Jitsi Meet (Ubuntu 18.04)
- Terraform code available (>= 0.12 / HCL2)
- Authentication (Users need to be authenticated to create new conferences) + Guest access (can only join existing conferences)
- LetsEncrypt certificate for HTTPS
- Collaborative working on a shared document during Jitsi conference (etherpad-lite)
- SQL Database for Jitsi authorized accounts
- Aurora Serverless (MySQL)
- Scale down to 0 to reduce costs
- AutoScalingGroup
- ASG notifications (+ SNS Topic)
- CloudWatch Logs (+ CloudWatch Agent)
- Route53 Public & Private records
- OPTIONAL: Cross-Account for Public & Private records
- Allow SSH by workstation IPv4 (can be disabled)
- Add other allowed IPv4 CIDRs for SSH
- Restrict Jitsi access CIDRs (Default: not restricted)
Infrastructure as Code
Quickstart (Terraform)
- Clone the git repository
git clone https://github.com/hajowieland/terraform-aws-jitsi.git - Create a
terraform.tfvarsand fill in the below variables as key = value one per line - If your Route53 Public & Private Hosted Zones are in the same AWS Account as where you want to deploy Jitsi, it’s just this:
| TF Variable | Description | Type | Default | Example |
|---|---|---|---|---|
| aws_region | AWS Region | string | eu-central-1 (Frankfurt) | eu-west-1 (Ireland) |
| domain | Jitsi Domain | string | example.com | napo.io |
| letsencrypt_email | LetsEncrypt E-Mail | string | mail@example.com | myemail@domain.com |
| public_subnet_ids | Public Subnet IDs | list(string) | "subnet-id-1", "subnet-id-2", "subnet-id-3"] | ["subnet-9ab8765", "subnet-1ab2c345", "subnet-01234567890ab01cd"] |
| public_zone_id | Public Zone ID | string | Z0123publiczone | ZC1BDEFGH2I3J |
| private_zone_id | Private Zone ID | string | Z456privatezone | Z01234567A89BC0D123E4 |
| vpc_id | VPC ID | string | vpc-123 | vpc-1a2b3456 |
Terraform module
Of course you can use it as Terraform module, too:
module "jitsi" {
  source  = "hajowieland/jitsi/aws"
  version = "1.0.0"

  aws_region = "eu-central-1"

  name   = "jitsi-meet"
  host   = "meet"
  domain = "example.com" # should match public and private hosted zone
  # will result in FQDN => meet.example.com

  ec2_instance_type = "t3a.large"
  vpc_id            = "vpc-123"
  public_subnet_ids = ["subnet-id-1", "subnet-id-2", "subnet-id-3"]

  # If the Route53 zones are in a different AWS Account:
  enable_cross_account = "1"
  arn_role             = "arn:aws:iam::other-account-id:role/route53-jitsi-other-account"

  public_zone_id  = "Z0123publiczone"
  private_zone_id = "Z456privatezone

  letsencrypt_email = "mail@example.com"

  # If you want to allow other SSH IPv4 CIDRs (in addition to your workstation's IPV4 address):
  ssh_cidrs = {
    "127.0.0.1/32"  = "first-ip-to-allow",
    "127.0.0.2/32"  = "second-ip-to-allow"
  }
}
Manual setup of simplified Jitsi-Meet on AWS (not recommended)
Here I show you the process of manually setting up Jitsi-Meet on AWS on a single EC2 instance. For a production-ready solution, please use the Terraform code above !)
It shows how the important steps of the EC2 Userdata in the Terraform code work.
Prerequisites
- EC2 Instance with Ubuntu 18.04
- You can connect to the instance with SSH
- MySQL / PostgreSQL database
Raise system limits
Jitsi needs increased files and process limits, so we set them in systemd:
echo "DefaultLimitNOFILE=65000" >> /etc/systemd/system.conf
echo "DefaultLimitNPROC=65000" >> /etc/systemd/system.conf
echo "DefaultTasksMax=65000" >> /etc/systemd/system.conf
systemctl daemon-reload
Update System, install Jitsi
echo 'deb https://download.jitsi.org stable/' >> /etc/apt/sources.list.d/jitsi-stable.list
wget -qO - https://download.jitsi.org/jitsi-key.gpg.key | apt-key add -
apt-get update
apt-get upgrade -y -q

# MySQL:
apt-get install -y -q jitsi-meet lua-dbi-mysql

# PostgreSQL
apt-get install -y -q jitsi-meet lua-dbi-postgresql
During install you get ask these two questions:
- Hostname: Set to the desired FQDN for your Jitsi instance (e.g.: meet.example.com)
- Certificate: Choose
Generate a new self-signed certificate(we will get a LetsEncrypt certificate later)
Now export the Hostname as environment variable which we will use in the next steps (replace with the FQDN you configured during install):
export HOSTNAME=meet.example.com
Etherpad
Now we are going to install etherpad-lite, which is integrated in Jitsi-Meet and allows us to collaboratively work together on a shared document during conferences.
Install etherpad-lite
Download node, clone etherpad-lite git repository and add a etherpad-lite system user:
curl -sL https://deb.nodesource.com/setup_13.x | sudo -E bash -
apt install -y nodejs
cd /opt/ || exit
adduser --system --home /opt/etherpad --group etherpad-lite
cd /opt/etherpad || exit
git clone --branch master https://github.com/ether/etherpad-lite.git
chown -R etherpad-lite:etherpad-lite /opt/etherpad/etherpad-lite
etherpad-lite systemd
To enable etherpad-lite at startup and be controlled by systemd, create a systemd unit file and enable the service:
cat << 'EOF' > /etc/systemd/system/etherpad-lite.service
[Unit]
Description=Etherpad-lite, the collaborative editor.
After=syslog.target network.target

[Service]
Type=simple
User=etherpad-lite
Group=etherpad-lite
WorkingDirectory=/opt/etherpad/etherpad-lite
Environment=NODE_ENV=production
ExecStart=/bin/sh /opt/etherpad/etherpad-lite/bin/run.sh
Restart=always

[Install]
WantedBy=multi-user.target
EOF


systemctl daemon-reload
systemctl enable etherpad-lite
systemctl start etherpad-lite
You can check if everything is working with:
systemctl status ethterpad-lite
journalctl -u ethterpad-lite -f
Enable ethterpad in Meet
The Meet component needs to know that it can now use Ethterpad:
sed -i "/makeJsonParserHappy.*/i\ etherpad_base: 'https://$HOSTNAME/etherpad/p/'", /etc/jitsi/meet/$HOSTNAME-config.js
Prosody SQL
To allow users to be created and stored in an SQL database, configure Prosody (the XMPP component of Jitsi) to use the database instead of local filestore:
sed -i "s/--storage = \"sql\".*/storage = \"sql\"/g" /etc/prosody/prosody.cfg.lua
Now fill in the MySQL / PostgreSQL credentials of your database (database name, user, password and host)
For MySQL:
sed -i "s/--sql = { driver = \"MySQL\".*/sql = { driver = \"MySQL\", database = \"${db_name}\", username = \"${db_user}\", password = \"${db_password}\", host = \"${db_host}\" }/g" /etc/prosody/prosody.cfg.lua
For PostgreSQL:
sed -i "s/--sql = { driver = \"PostgreSQL\".*/sql = { driver = \"PostgreSQL\", database = \"${db_name}\", username = \"${db_user}\", password = \"${db_password}\", host = \"${db_host}\" }/g" /etc/prosody/prosody.cfg.lua
Prosody initially used to local filestore for the focus and jvb users, we need them to be converted to our SQL backend.
We can use Prosody Migrator for this task. First we createa Migrator config (fill in your Database data like in the previous step):
For MySQL:
cat <<EOT >> /tmp/migrator.cfg.lua
filestore {
         type = "prosody_files";
         path = "/var/lib/prosody";
}
database {
         type = "prosody_sql";
         driver = "MySQL";
         database = "${db_name}";
         username = "${db_user}";
         password = "${db_password}";
         host = "${db_host}";
}
EOT
For PostgreSQL:
cat <<EOT >> /tmp/migrator.cfg.lua
filestore {
         type = "prosody_files";
         path = "/var/lib/prosody";
}
database {
         type = "prosody_sql";
         driver = "PostgreSQL";
         database = "${db_name}";
         username = "${db_user}";
         password = "${db_password}";
         host = "${db_host}";
}
EOT
And then we migrate the local filestore to the SQL database:
prosody-migrator filestore database --config=/tmp/migrator.cfg.lua
Configure Authentication
By default, no authentication is set which means every (unauthenticated!) user can create new conferences (and if you have a public Jitsi instance, this means everyone).
This exposes Jitsi to various spam/flood attacks and the Jitsi instance may be used for unintended purposes.
So we definitely need to set up authentication. In the previous step we configured the database backend for the internal Jitsi users and our authenticated users we can add later.
In Jitsi Meet and Prosody we set up a guest domain:
sed -i "s|// anonymousdomain:.*|anonymousdomain: 'guest.$HOSTNAME',|g" /etc/jitsi/meet/$HOSTNAME-config.js

cat <<EOT >> /etc/prosody/conf.avail/$HOSTNAME.cfg.lua
VirtualHost "guest.$HOSTNAME"
    authentication = "anonymous"
    c2s_require_encryption = false
EOT
In Jicofo (the focus component), we configure the XMPP auth url so it connects to XMPP (= Prosody) for authentication:
echo "org.jitsi.jicofo.auth.URL=XMPP:$HOSTNAME" >> /etc/jitsi/jicofo/sip-communicator.properties
nginx configuration
Finally we configure nginx for etherpad-lite and for a seperate interface configuration.
The latter allows us for example to modify the visible Toolbar Buttons (TOOLBAR_BUTTONS) in Jitsi.
We use a seperate config file for this so it does not get overwritten by a Jitsi update.
# interface config
cp /usr/share/jitsi-meet/interface_config.js /etc/jitsi/meet/$HOSTNAME-interface_config.js
sed -i "s|^}|\    location = /interface_config.js {\n        alias /etc/jitsi/meet/$HOSTNAME-interface_config.js;\n    }\n}|g" /etc/nginx/sites-enabled/$HOSTNAME.conf

# ethterpad-lite
sed -i "s|^}|\    location ^~ /etherpad/ {\n        proxy_pass http://localhost:9001/;\n        proxy_set_header X-Forwarded-For \$remote_addr;\n        proxy_buffering off;\n        proxy_set_header       Host \$host;\n    }\n}|g" /etc/nginx/sites-enabled/$HOSTNAME.conf
LetsEncrypt
As a last step we request a LetsEncrypt certificate. Luckily, Jitsi already provides us with a handy script:
/usr/share/jitsi-meet/scripts/install-letsencrypt-cert.sh
(You get asked for an email adress).
All necessary configuration and auto-renewal (cronjob) will be configured by the script 👍
Restart services
Now restart all services and then you are ready to use your shiny new Jitsi-Meet instance 👏
systemctl restart nginx
systemctl restart prosody
systemctl restart jicofo
systemctl restart jitsi-videobridge2
Add authenticated users
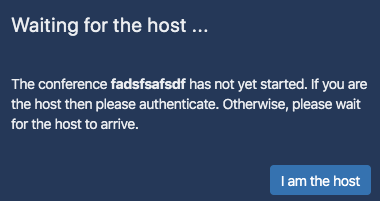
If you visit Jitsi-Meet with your browser and create a new conference, you have to authenticate as host:
New users can be created in Prosody via prosodyctl:
# Create a new user test
prosodyctl adduser test@$HOSTNAME
# Asks for password
Now try right away to log in with this new user and voilâ –> Now you can invite guests to your conference (they do not have to authenticate - but can only conferences with are created by authenticated users).
To collaborate together on a shared document:

Final Words
If you encounter any problems or have some ideas on how to enhance the IaC code ➡️ please let me know!
I would be very happy to see some Pull Requests on GitHub for the Terraform code of this blog post: