15 minutes
Terraform Kubernetes Multi-Cloud (ACK, AKS, DOK, EKS, GKE, OKE)
To be clear: I ❤️ Kubernetes ! This is why I’m spending most of my free learning resources on reading about Kubernetes, watching conference talks about Kubernetes (KubeCon EU 2019!) and get my hands on as much tools and services which exist in the ever growing K8s ecosystem.
At work I’m mostly using the AWS cloud (=> EKS), so I thought it would be interesting to see how all the other Major Public Cloud vendors implement managed Kubernetes services. Besides, Terraform 0.12 got released, so this is a perfect opportunity to combine my Terraform + Kubernetes skills and write some code to create K8s clusters on some of the major cloud platforms out there. And of course to share this with you so maybe this may come in handy for some other guys and gals out there, too.
The Terraform code creates minimal Kubernetes clusters at the big major public cloud platforms who offer a managed Kubernetes service. Most of the time it provisions 2-3 worker nodes with small instance type configurations (dependant on the cloud platform). You can enable/disable specific clouds or of course enable them all at once 🙃
At the end you get ready-to-use kubeconfig files to be used with kubectl (“kubecuddle”).
But please be aware: this is not production-ready code, it is by all means only to be used for learning/testing purposes. Finally, there is always so much more which can be configured, secured and enhanced - so please feel free to send me a PR or contact me directly. But keep in mind that this code is intended to create minimal useable Kubernetes clusters for private use only.
Supported Public Cloud platforms
- ✅ Alibaba Cloud (Aliyun) ACK
- ✅ Amazon Web Services (AWS) EKS
- ✅ DigitalOcean (DO) Kubernetes
- ✅ Google Cloud Platform (GCP) GKE
- ✅ Microsoft Azure AKS
- ✅ Oracle Cloud Infrastructure (OCI) OKE
Features
- Simple but effective Terraform 0.12 code
- Minimum viable Kubernetes clusters
- Pick specific cloud platforms or use them all at once
- Creates ready-to-use kubeconfig files
- Allows SSH/API access only from workstation IP address only (where applicable)
Requirements
- Terraform >= 0.12.x
- Account(s) on the desired Cloud platform(s)
- Basic configuration (see cloud sections below)
- Use either the CLI or the Web GUI, whatever you feel more comfortable with
Links
GitHub: hajowieland/terraform-kubernetes-multi-cloud
Terraform Registry: hajowieland/multi-cloud/kubernetes
Quickstart
So here we go:
git clone https://github.com/hajowieland/terraform-kubernetes-multi-cloud
Configure the variables to fit your needs - especially the enable_* ones for the cloud platforms to use and their corresponding credential configurations:
enable_alibaba = true
enable_amazon = true
enable_digitalocean = true
enable_google = true
enable_microsoft = true
enable_oracle = true
Then simply do a terraform plan to check the resources to be created and if everything is fine:
terrraform apply
Preparations
You can either use the individual Terraform modules for the cloud platforms below or use the multi cloud module and enable/disable the clouds you want to use.
Amazon Web Services
GitHub: hajowieland/terraform-aws-k8s
Terraform: hajowieland/k8s/aws
In conjunction with Google’s Kubernetes Engine, the Elastic Kubernetes Service by AWS may be the most prominent. But on AWS you have to pay for the Kubernetes control plane itself in addition to the worker EC2 instances you will use. Nevertheless EKS gets used by a lot of companies out there and everybody who is interested in K8s on AWS should check it out and get comfortable with.
Defaults
Some default values which you might want to change, for a complete list please check the variables.tf file.
| Terraform Variable | Default | Description |
|---|---|---|
| aws_profile | default | AWS CLI profile name |
| aws_region | eu-central-1 | AWS region Frankfurt, Germany |
| eks_nodes | 2 | Number of Kubernetes worker nodes |
| aws_instance_type | t3.medium | EC2 instance type with 2 vCPU and 4GB memory |
Prerequisites
We assume you already have the following:
Create IAM user
You should never use your AWS root account for anything, so first create an IAM user and get the access key and secret access key for this IAM user:
- Create an IAM user
- Create access keys for your IAM user
Setup aws-cli
If you haven’t already done so, install the AWS CLI on your system. We are not using access keys directly in Terraform so we just configure a profile which we want to use.
Check if your aws-cli profile is working correctly and configure the following Terraform variable to match your config:
aws_profile=> default
terraform apply
Set enable_amazon to true in variables.tf file and do a terraform apply ✔️
Alibaba Cloud
GitHub: hajowieland/terraform-alicloud-k8s
Terraform Registry: hajowieland/k8s/alicloud
The Alibaba Cloud or “AliCloud”, often abbreviated to just “aliyun”, is the somewhat nice chinese clone of AWS 😅. But be aware that it comes with some quirks, more details on that below.
❕If you encounter any errors, I would recommend to go to the web console and open the Alibaba Container Service. If any permissions are missing, the RAM will notify you there.
⚠️ The permissions of the RAM policies are not as strict as they should be if running in production!
ℹ️ By default we use the eu-central-1 (Frankfurt, Germany) region. Every NAT Gateway is billed daily. In this region a NAT Gateway costs 3.292$ / day (NAT gateway pricing). Every time you create a NAT resource you are billed for it at least a full day. The Terraform module includes some disabled (commented) code which you can enable to use an already existing NAT gateway.
HINT: The lifecycle of the NAT gateway resource is set to: prevent_destroy = true to avoid destroying/creating the NAT gateway. So you have to it to false or manually delete it via the Web Console / aliyun-cli.
🔴 NOTE: When developing this module I ran into the Aliyun Risk Control System. If this happens to you, then you have to contact Alibaba support and provide additional details to verify your account before you can continue.
Sadly, the transfer of these very sensitve documents (photo/scan of passport, photo/scan of bank card and last months bank statement) happens via E-Mail and they do not support GPG encryption (yet)…
I opened a Suggestion on Alibaba Connect so that they hopefully provide encrypted communication channels for such documents in the near future.
Default Kubernetes Services
Your cluster on the Alibaba Cloud Managed Container Service for Kubernetes is provisioned with these services by default:
Aliyun
- alicloud-application-controller
- alicloud-disk-controller
- alicloud-monitor-controller
- aliyun-acr-credential-helper
K8s
Additional services
Defaults Terraform
Some default values which you might want to change, for a complete list please check the variables.tf file.
| Terraform Variable | Default | Description |
|---|---|---|
| ali_access_key | User AccessKey ID | |
| ali_secret_key | User Access Key Secret | |
| ali_region | eu-central-1 | Alibaba Cloud region Frankfurt, Germany |
| ack_node_count | 2 | Number of Kubernetes worker nodes |
| ack_node_type | ecs.sn1.medium | ECS instance type with 2x vCPU and 4GB memory |
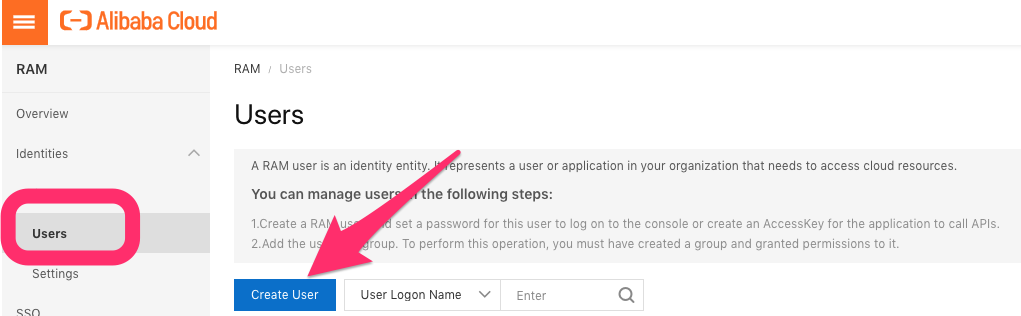
Create RAM user
You should never use your Alibaba Cloud root account for anything, so first create a RAM user and get the access key and secret access key:
- Create a RAM user (HERE)
- Create access keys for your RAM user
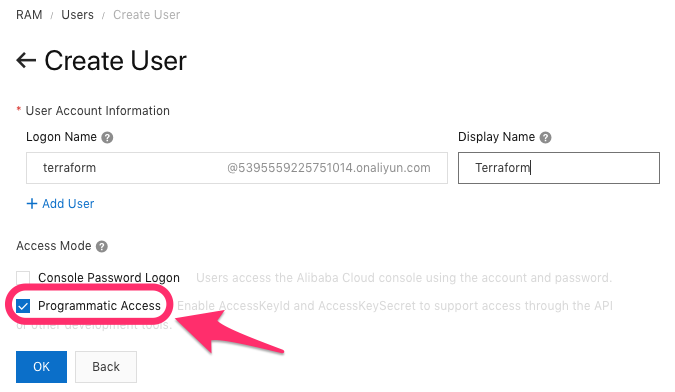
Save / copy the AccessKeyId and AccessKeySecret values.
Set AccessKey in Terraform
Now set the following Terraform variables to match your AccessKey information:
ali_access_key=> AccessKey IDali_secret_key=> Access Key Secret
Enable services
On Aliyun, activate the following services in their respective consoles.
ℹ️ You may have to enable billing and verify your credit card beforehand.
and accept the Service Terms for all these services.
For more information on the prerequisites see the official “Create a Kubernetes cluster” documentation page.
If you have missed enabling some of the services above, you might run into issues like this during terraform apply:
terraform apply
Set enable_alibaba to true in variables.tf file and do a terraform apply ✔️
terraform destroy
During a terraform destroy you will get errors because the RAM policies are set with a lifecycle prevent_destroy => true. Otherwise we can’t destroy the cluster.
When you are doing a terraform apply again, be sure to delete the RAM grants, roles and policies beforehand!
Google Cloud
GitHub: hajowieland/terraform-google-k8s
Terraform Registry: hajowieland/k8s/google
Google Cloud Platform is definitely the go-to public cloud if you are interested in using Kubernetes. It is not only from Google itself (who created Kubernetes and its predecessors Borg and Omega) but it is also up-to-date and easy to use. And in comparison to the Amazon EKS managed service, you do not have to pay for the control plane - you only pay for the worker nodes (and LBs etc.) you actually use.
ℹ️ By default we use the n1-standard-1 instance type (1 vCPU, 3.75 GB memory). Horizontal Pod Autoscaling is disabled, otherwise the Cluster would reconcile after creation during the initialization phase for the default pods in kube-system namespace.
Defaults
Some default values which you might want to change, for a complete list please check the variables.tf file.
| Terraform Variable | Default | Description |
|---|---|---|
| gcp_project | GCP Project ID | |
| gke_serviceaccount | default | GCP service account for GKE |
| gcp_region | europe-west3 | Google Cloud region Frankfurt, Germany |
| enable_regional_cluster | false | Creates zonal GKE cluster instead of regional one |
| gke_nodes | 2 | Number of Kubernetes worker nodes |
| gke_node_type | n1-standard-1 | Instance type with 1x vCPU and 3.75GB memory |
Set up your credentials according to the official docs or follow my instructions:
CLI
Create project
export RANDOM_ID=$RANDOM
gcloud projects create terraform-k8s-$RANDOM_ID --name="Terraform Kubernetes GKE" \
      --labels=type=k8s
List your projects:
gcloud projects list
Set the project in gcloud:
gcloud config set project terraform-k8s-$RANDOM_ID
Enable GKE API
Enable Kubernetes Engine API so Terraform can use it later:
gcloud services enable container.googleapis.com
export SERVICE_ACCOUNT_NAME=terraform
export PROJECT_ID=$(gcloud config get-value project)
cloud iam service-accounts create ${SERVICE_ACCOUNT_NAME}
Create Service Account for Terraform
Create a new service account:
gcloud beta iam service-accounts create $SERVICE_ACCOUNT
    --description "Deploys IaC with Terraform"
    --display-name "terraform"
Set Service account permissions
Give the Service account Kubernetes Engine Admin rights (be aware that this role gives you FULL Kubernetes Engine permissions!):
gcloud projects add-iam-policy-binding ${PROJECT_ID} \
  --member="serviceAccount:${SERVICE_ACCOUNT_NAME}@${PROJECT_ID}.iam.gserviceaccount.com" \
  --role='roles/container.admin'
Create Service account JSON key file
Create the service account JSON file:
gcloud iam service-accounts keys create \
  --iam-account "${SERVICE_ACCOUNT_NAME}@${PROJECT_ID}.iam.gserviceaccount.com" \
  account.json
GUI
If you are not familiar with the gcloud command-line tool, then you can always use the Google Cloud Web GUI to create everything we need.
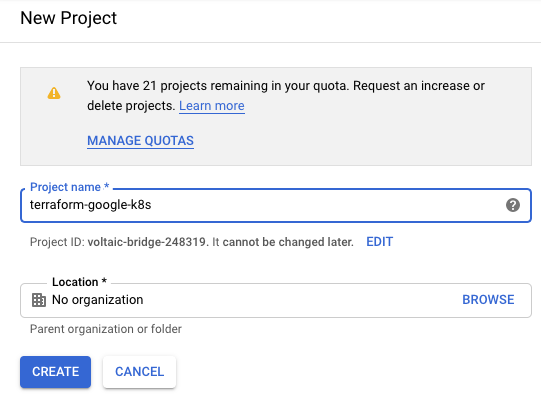
Create Project
First you have to create a new Google Cloud Project: https://console.cloud.google.com/projectcreate
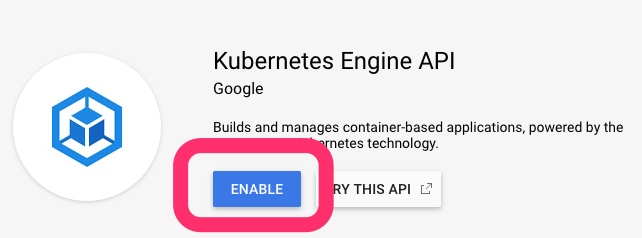
Enable GKE API
Enable the GKE API: https://console.developers.google.com/apis/api/container.googleapis.com/overview
Create Service Account for Terraform
Create a new Service Account: https://console.cloud.google.com/iam-admin/serviceaccounts
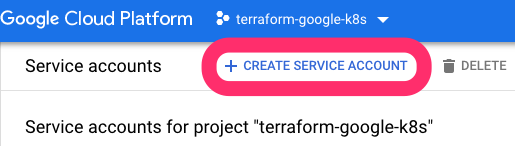
.. and set the details:

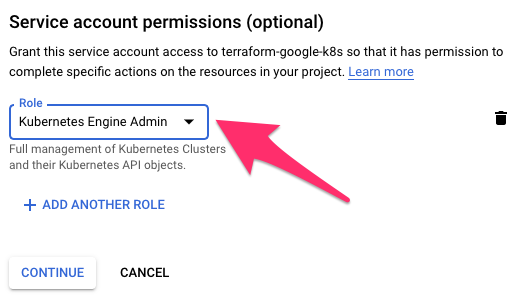
Grant Service account permissions
Grant the Service account permissions to the Kubernetes Engine Admin role.
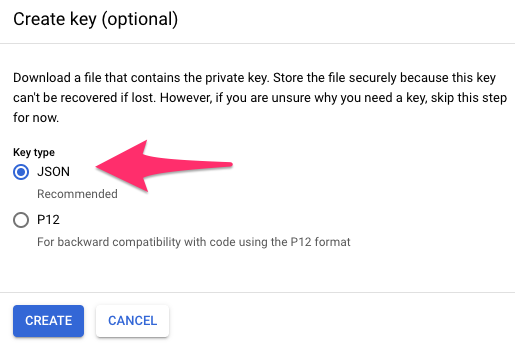
Create Service account JSON key file
We leave Grant users access to this service account (optional) empty but use Create Key in the Create key (optional) section and select JSON as the Key type and finally download the corresponding JSON file.
Rename the downloaded file to account.json and then move it into the root path of the cloned GitHub repository with the Terraform code.
ℹ️ You may have to enable billing for your account if you haven’t done so already.
Set GOOGLE_APPLICATION_CREDENTIALS envvar
Finally set the GOOGLE_APPLICATION_CREDENTIALS environment variable to the path of your account.json file you have downloaded in the previous step:
For example, if it is in your Downloads directory:
export GOOGLE_APPLICATION_CREDENTIALS=$HOME/Downloads/account.json
terraform apply
Set enable_google to true in variables.tf file and do a terraform apply ✔️
Microsoft Azure
GitHub: hajowieland/terraform-azurerm-k8s
Terraform Registry: hajowieland/k8s/azurerm
It might seem odd to create a Kubernetes cluster on Microsoft’s Azure cloud, but as you might already know, Linux is more used on Azure than Windows Server.
Create a new Microsoft Azure account with a billing subscription (the easiest is a Pay-As-You-Go plan).
Defaults
Some default values which you might want to change, for a complete list please check the variables.tf file.
| Terraform Variable | Default | Description |
|---|---|---|
| az_client_id | Azure Service Principal appId | |
| az_client_secret | Azure Service Principal password | |
| az_tenant_id | Azure Service Principal tenant | |
| aks_region | westeurope | Azure region Netherlands |
| aks_nodes | 2 | Number of Kubernetes worker nodes |
| aks_node_type | Standard_D1_v2 | VM instance type with 1x vCPU and 3.5GB memory |
If you don’t have all the parameters above yet, please install the azure-cli tool (or use the GUI) and then follow the instructions below.
CLI
Terraform Documentation to set up Azure using a Service Principal and a Client Secret
Login with azure-cli
First login via the azure-cli:
az login
Now you can list your Subscriptions:
az account list
OPTIONAL: Set subscription ID
If you have more than one subscription ID, set the one you want to use with Terraform:
az account set --subscription="SUBSCRIPTION_ID"
Create Service Principal
Now create a Service Principal for this Subscription using the following command:
az ad sp create-for-rbac --role="Contributor"
OPTIONAL: If you have more than one subscription, replace SUBSCRIPTION_ID with the one you set in the previous step:
az ad sp create-for-rbac --role="Contributor" --scopes="/subscriptions/SUBSCRIPTION_ID"
Verify credentials
You can verify everything works as expected by first logging in:
az login --service-principal -u CLIENT_ID -p CLIENT_SECRET --tenant TENANT_ID
Set Terraform variables
The command will output several values and are mapped to Terraform variables as follows:
| Azure | Terraform |
|---|---|
| appId | client_id |
| password | client_secret |
| tenant | tenant_id |
GUI
OPTIONAL: Set subscription ID
If your Azure Trial subscription has ended and you didn’t already enable the Pay-As-You-Go (or any other) subscription, create one here:

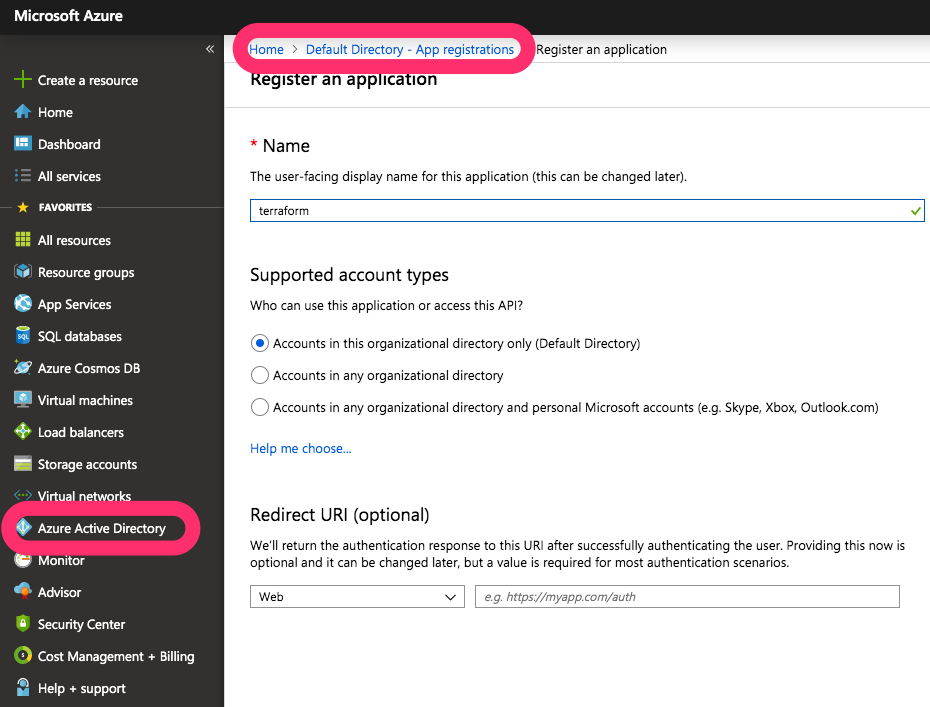
Create Service Principal
Now on the right menu in Azure Active Directory » App registrations create a new app and Service Principal for Terraform:
terraform apply
Set enable_microsoft to true in variables.tf file and do a terraform apply ✔️
Digital Ocean
GitHub: hajowieland/terraform-digitalocean-k8s
Terraform Registry: hajowieland/k8s/digitalocean
Setting up a fully fledged managed Kubernetes cluster may be the simplest on the Digital Ocean cloud platform.
ℹ️ We create one initial node pool with the Kubernetes cluster itself plus a separate node pool with 2 worker nodes. So by default we have 3 worker nodes, but with this additional node pool we can easily scale our worker nodes afterwards.
Defaults
Some default values which you might want to change, for a complete list please check the variables.tf file.
| Terraform Variable | Default | Description |
|---|---|---|
| do_token | Digital Ocean Personal access token | |
| do_region | fra1 | Digital Ocean region Frankfurt, Germany |
| do_k8s_nodepool_type | 2 | Number of Kubernetes node pool worker nodes |
| do_k8s_nodepool_size | s-1vcpu-2gb | Droplet with 1x vCPU and 2GB memory |
Just sign up (if you want to support me, use THIS link to get some free credit for both of us).
Then create a Personal access token on the API page here: https://cloud.digitalocean.com/account/api/tokens

- After that, either export the token as an environment variable:
export DIGITAL_OCEAN_TOKEN=mytoken
or configure it in your terraform.tfvars file by setting the do_token variable.
terraform apply
Set enable_digitalocean to true in variables.tf file and do a terraform apply ✔️
Oracle Cloud Infrastructure
GitHub: hajowieland/terraform-oci-k8s
Terraform: hajowieland/k8s/oci
Last but not least there is the Oracle Cloud which also offers a managed Kubernetes service. It has excellent documentation like for what Oracle is known for in the industry. It is definitely targeted to bigger enterprise customers and has the features this audience might need and their Terraform provider is working okay (mostly).
https://docs.cloud.oracle.com/iaas/Content/ContEng/Concepts/contengprerequisites.htm
ℹ️ You might need to request a Service Limit Increase.
- On the left menu choose Governance » Service Limits
If your using the default settings (Region: Frankfurt, Instance Type: VM.Standard2.1) you can use this DIRECT LINK to increase the limit.
ℹ️ If you encounter the following error during a terraform apply:
“Error: Service error:LimitExceeded. The cluster limit for this tenancy has been exceeded.. http status code: 400”
Just give it a second try and it may work… 🤔
Defaults
Some default values which you might want to change, for a complete list please check the variables.tf file.
| Terraform Variable | Default | Description |
|---|---|---|
| oci_user_ocid | Oracle Cloud User OCID | |
| oci_tenancy_ocid | Oracle Cloud Tenancy OCID | |
| oci_private_key_path | ~/.oci/oci_api_key.pem | Oracle Cloud user private key path |
| oci_public_key_path | ~/.oci/oci_api_key_public.pem | OCI Public key path |
| oci_fingerprint | OCI SSH public key fingerprint | |
| oke_node_pool_size | 2 | Worker node pool quantity per subnet |
| oci_node_pool_node_shape | VM.Standard2.1 | Node pool Shape (e.g. VM.Standard2.1 => 1vCPU, 15GB RAM) |
Prerequisites
We assume you already have the following:
Official documentation on Preparing for Container Engine for Kubernetes.
Required Keys and OCIDs
First you need a API Signing Key and your corresponding user OCID and tenancy OCID.
https://docs.cloud.oracle.com/iaas/Content/API/Concepts/apisigningkey.htm
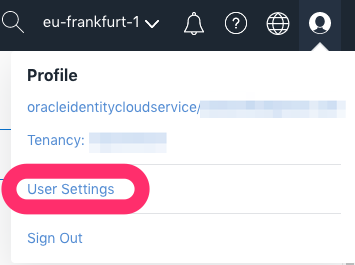
To get your User OCID use the User icon in the upper right menu and copy the OCID:
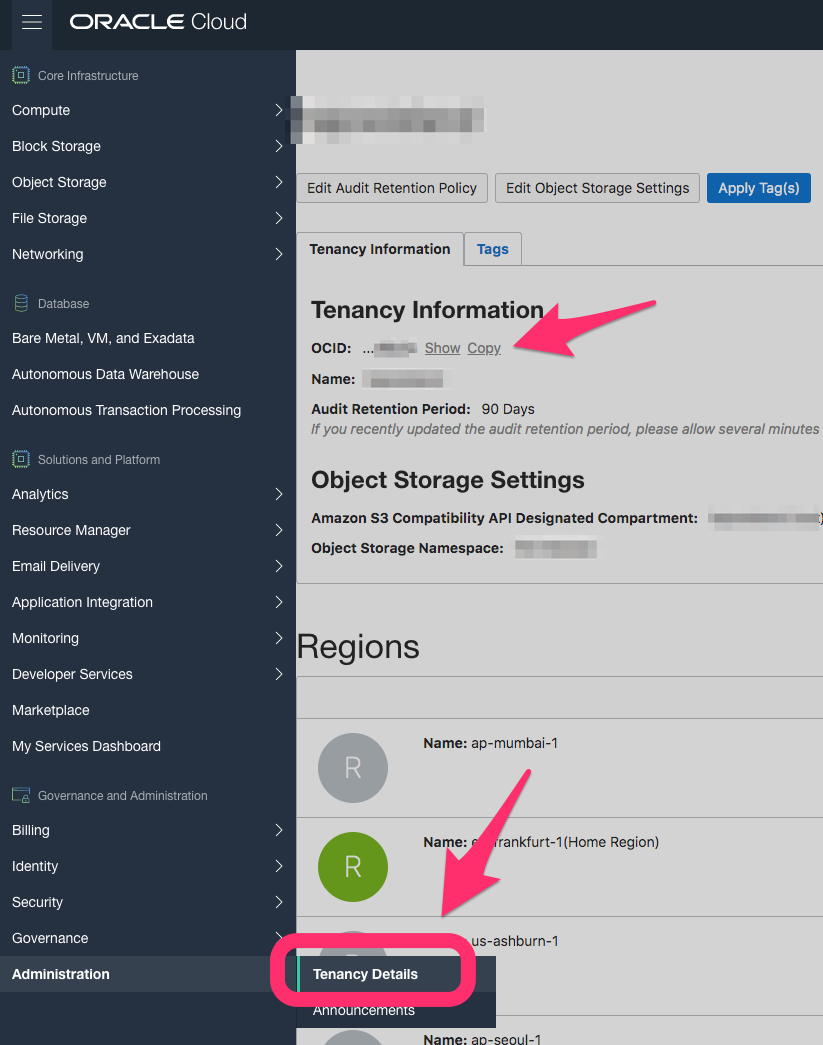
For the Tenancy OCID, use the right menu and at the end in Administration » Tenancy Details copy the OCID:
Generate API Signing Key
We create a private key without a passphrase:
mkdir ~/.oci
openssl genrsa -out ~/.oci/oci_api_key.pem 2048
chmod go-rwx ~/.oci/oci_api_key.pem
Now we create the public key of this private key and copy it into our clipboard on macOS:
openssl rsa -pubout -in ~/.oci/oci_api_key.pem -out ~/.oci/oci_api_key_public.pem
cat ~/.oci/oci_api_key_public.pem | pbcopy
Now in the Oracle Cloud web console click on your user icon at the top right menu.
In the section API Keys click on Add Public Key and paste the public key from your clipboard.
If you have changed the paths above then modify the Terraform variables accordingly:
- oci_private_key_path
- oci_public_key_path
Get Key Fingerprint
To get the API Key’s fingerprint, execute the following command:
openssl rsa -pubout -outform DER -in ~/.oci/oci_api_key.pem | openssl md5 -c
Set the value of the oci_fingerprint Terraform variable to this fingerprint.
Get User OCID and Tenancy OCID
terraform apply
Set enable_oracle to true in variables.tf file and do a terraform apply ✔️
It can take a few minutes after Terraform finishes until the Kubernetes nodes are available!
Final words
There is some major public cloud provider missing: IBM Cloud. Unfortunately as of this writing, their provider is not working with Terraform 0.12 yet. I will create another post for creating a managed Kubernetes cluster on IBM cloud with Terraform version 0.11 during the next couple of days. And of course as soon as their provider works with Terraform 0.12, I will update this post and the multi-cloud module accordingly.
And finally: If you encounter any problems or have some ideas on how to enhance the modules ➡️ please let me know!
I’m very happy to see some Pull Requests on GitHub for the Terraform modules of this blog post:
- https://github.com/hajowieland/terraform-aws-k8s
- https://github.com/hajowieland/terraform-alicloud-k8s
- https://github.com/hajowieland/terraform-google-k8s
- https://github.com/hajowieland/terraform-azurerm-k8s
- https://github.com/hajowieland/terraform-digitalocean-k8s
- https://github.com/hajowieland/terraform-oci-k8s