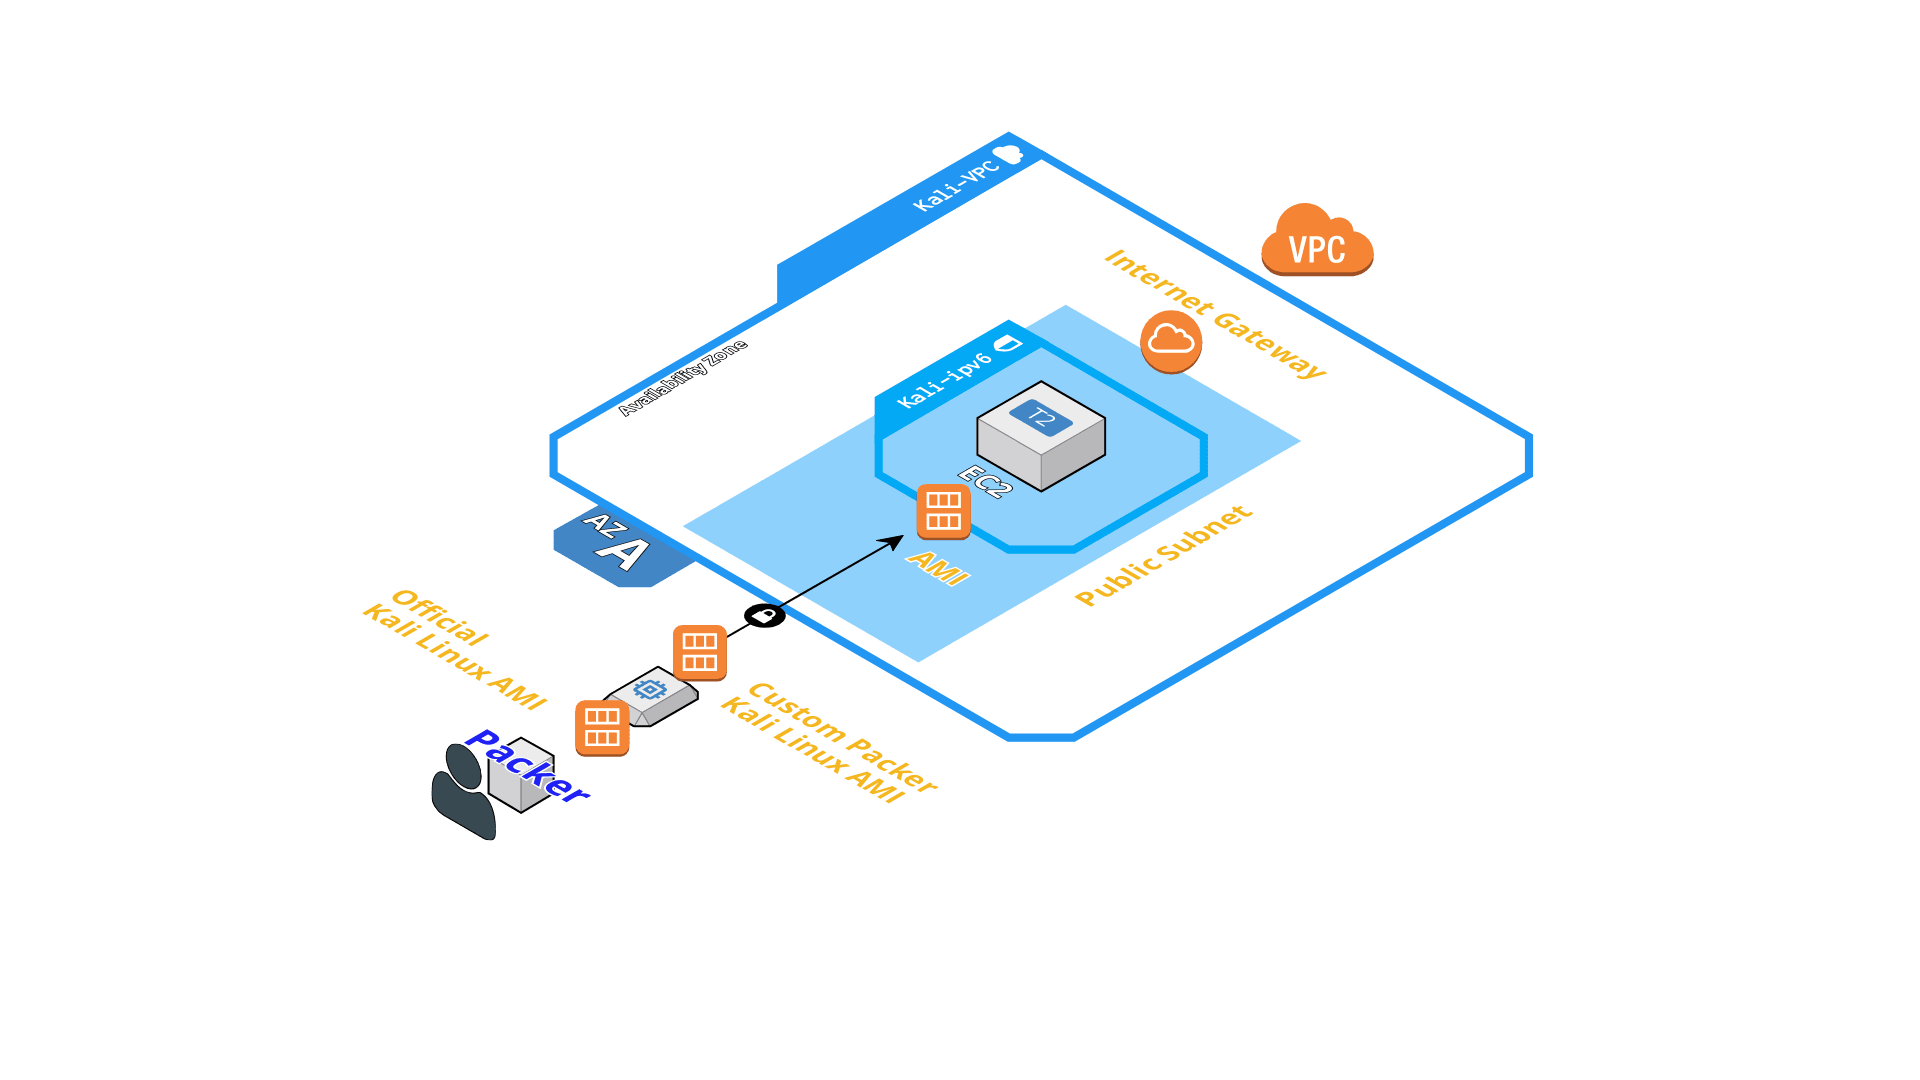
Terraform & Packer to create a Kali Linux AWS EC2 Instance
Recently I needed a up-to-date Kali Linux on an AWS EC2 instance to do some security testing and found that the official Kali Linux AMI is based on 2018.3a (from August 2018). The notorious apt-get update && apt-get dist-upgrade -y took some time because it needed to download and update ~2000 packages.
Additionally I thought it would be nice to create a fully-fledged Kali Linux EC2 instance by utilizing Terraform so I could spin up and down a security machine as needed.
PROTIP: You can choose a GPU EC2 instance type to have additional hash cracking power 🤓
Here I want to share a step-by-step guide for everyone else who might need a up-to-date Kali Linux EC2 instance.

Quickstart
If you want to jump right in, just head over to GitHub and follow the instructions there:
https://github.com/hajowieland/terraform-kali-linux
Install Terraform & Packer
If you already have Terraform and Packer installed, you can skip this section.
macOS
On macOS with Homebrew this is as simple as this:
brew install packer terraform
Linux
On your Linux distribution of choice, you can either use a package manager or use Robert Peteuil’s scripts to directly get the go binaries from HashiCorp:
You need to have curl, jq and unzip installed!
curl iac.sh/terraform | sh
curl iac.sh/packer | sh
Set up your AWS credentials
If you haven’t already done so, configure your AWS cli programmatic access. There are several ways to do this (e.g. use static aws_access_key_id & aws_secret_access_key or temporary STS credentials) so I don’t go into the details here. You can find an example tutorial to setup your static credentials when following this link:
https://letslearndevops.com/2017/07/24/how-to-set-up-terraform-credentials/
NOTE:
My packer.json file uses the AWS credentials obtained from the environment variables AWS_ACCESS_KEY_ID and AWS_SECRET_ACCESS_KEY.
Clone git repository
You’re probably already familiar with this:
git clone git@github.com:hajowieland/terraform-kali-linux.git
Build the Kali AMI with Packer
We will build our own Amazon Machine Image “AMI” so we can have the official Kali Linux AMI but with all updates installed.
Change into the terraform-kali-linux directory and run Packer:
packer build packer.json
This will start a temporary EC2 instance with an atttached EBS volume and the official Kali Linux AMI as source_ami. Then it executes the inline shell commands in the provisioners section as root (_execute_command) and sets an environment variable so apt works noninteractive (environment_vars).
The generated AMI name will be in the format of: kali-linux-aws-{{timestamp}}.
When Packer has successfully finished it’s job, you get an AMI ID at the end. This may look like this (here I show you the AMI ID of the official Kali Linux AMI, you’re packer execution results in a unique ID of course):
==> Builds finished. The artifacts of successful builds are:
--> amazon-ebs: AMIs were created:
eu-central-1: ami-10e00b6d
Note down this AMI ID because we will use this in Terraform during the next step.
Customize Terraform for your AWS resource configuration
Create a new file terraform.tfvars in the the terraform-kali-linux directory you cloned at the beginning.
Here you can customize the AWS resources Terraform is going to create to satisfy your needs. The most important thing is to configure the AMI which the EC2 instance will use. This will be our custom Kali Linux AMI we created with Packer in the last step:
terraform.tfvars:
packer_ami = ami-youramiid
And if you need a GPU attached to your instance for password cracking (or their hashes), choose a GPU-optimized instance type (P, G or even F):
ec2_instance_type = g3s.xlarge
There are other things you can configure, for example if you want to create a whole new AWS VPC or use an existing one where the new Kali EC2 instance will be deployed. Or if you want to use IPv4 only or let it be IPv4 & IPv6. Another important config item is whether you want to use an existing AWS Key pair or create a new one from your SSH public key.
terraform.tfvars:
aws_region = "eu-central-1" # The AWS region to use
aws_profile = "default" # The AWS profile which Terraform should use
create_vpc = false # Do not create a new VPC
vpc_id = "vpc-0abc1d23e4f567f8" # Use this already-existing VPC
subnet_id = "subnet-01a23b456c7d89" # Use this already-existing Subnet
public_key_path = "~/.ssh/private/id_rsa.pub" # Create new Key pair from this public key
use_ipv6 = true # Use IPv4 AND IPv6
ec2_instance_type = "t2.medium" # Use an t2.medium as EC2 instance type
Another example terraform.tfvars file which creates a new VPC and uses IPv4-only:
terraform.tfvars:
aws_region = "eu-central-1"
aws_profile = "default"
create_vpc = true # Create a new VPC
public_key_path = "~/.ssh/private/id_rsa.pub"
use_ipv6 = false # Does NOT use IPv6 (IPv4-only)
ec2_instance_type = "t2.large" # Uses a t2.large as EC2 instance type
Look into the variables.tf file to see all variables you can edit and their default values. You find a nice overview on the GitHub repository description.
Now, in the final step, run a terraform plan to review all resources:
terraform plan
and then a terraform apply to deploy this configuration on AWS:
terraform apply
Connect to your Kali EC2 instance
Finally, after Terraform has completed, the public IPv4 address of the EC2 instance is displayed to you.
You can connect to your new instance with the SSH key you configured earlier and the user ec2-user.
HAVE FUN!